What was your favorite part of CSI? The detective work? The blood-splatter-analysis? DNA testing? Body fluid searching with the black light? My favorite part was the technical, computer-based analysis. Granted this aspect of the investigation wasn't featured a whole lot on the original show, and even when it was, there were glaring technical inaccuracies - but still...it was pretty cool.
In this post, I'm going to introduce you to a few common, but powerful, Linux-based tools that can help you get started in learning about Digital Forensics...
In this post, I'm going to introduce you to a few common, but powerful, Linux-based tools that can help you get started in learning about Digital Forensics...
Resources
Many of the information I'll be showing you here, including the numerous examples, actually come from Barry Grundy's site www.linuxleo.com. If you're at all interested in forensics, I highly recommend visiting his site, downloading the "Beginner's Guide v3.78" PDF, along with all of the supplemental files, and working through it.
This post is only meant to provide you with a very basic explanation of some of the essential forensic analysis tools. However, Barry provides a lot of great information, and goes a lot more in-depth than I'm going to, while remaining incredibly accessible to beginners.
Finally, for more information on any of the tools I present here, you can use the man <cmd> command to view the tool's manual page. For example man dd. You can also type that in at Google and find online versions of the man pages.
Forensic Analysis Objectives
The basic objectives that these tools will help you to meet are:
The basic objectives that these tools will help you to meet are:
- Creating a bit-for-bit copy of data (dd)
- Creating check sums for verifying data integrity (sha1sum)
- Mounting an image with explicit read-only access (mount)
- Mapping the file hierarchy within an image (ls)
- Enumerating files within an image (find)
- Enumerating file types within an image (find)
- Searching for specific file types within an image (find)
- Searching for specific strings within an image (grep)
- Using the byte offset to view binary data in an image (xxd)
Deft 8.1
For forensic analysis, I prefer using Linux, and my favorite forensic-centric distribution is Deft (which you can download for free here). Deft comes standard with all of the tools I'll be showcasing today, as well as a whole host of other powerful tools.
Along with Barry Grundy's PDF, I also highly recommend downloading the Deft Manual and at least perusing through it to get an idea of the built-in tools and applications it features.
Using a Virtual Machine
Once you've downloaded the ISO, go ahead and install Deft onto a virtual machine to experiment. You can use Virtual Box or VMWare Player for this. Deft is pretty light-weight, but I gave it 2GB of memory, and 20GB of hard-drive space (both of which is probably overkill).
Deft can also be ran as a 'live' environment, which is certainly ideal in a situation where you're working with actual data and evidence. However, the virtual machine option works best, in my opinion, for learning.
Creating a bit-for-bit Copy of Data
Before performing any kind of analysis, it is vital to make a bit-for-bit copy of that data or drive, that you can work with. Never perform analysis on an original drive. The drive in question that I'll be working with in these examples, is practical.floppy.dd which can be downloaded here.
To create a bit-for-bit copy of the image, Deft includes dd, a powerful tool. At minimum, dd takes two parameters: if the input file, and of the output file.

You can also specify the byte size using the bs option:

In more advance use cases, dd can also be used for file carving -although there are other tools that are probably better suited for it.
There are other versions of dd as well that can be used in various use cases. For example ddrescue is primarily used for data recovery, and dc3dd and dcfldd incorporate built-in hashing and splitting.
There are other versions of dd as well that can be used in various use cases. For example ddrescue is primarily used for data recovery, and dc3dd and dcfldd incorporate built-in hashing and splitting.
Creating Check Sums for Verifying Data Integrity
After making a bit-for-bit copy of the data, it's important to generate a hash on both the original and the copy, and compare them to ensure that the copy is true. We can do this with sha1sum (or md5sum if you prefer)
After making a bit-for-bit copy of the data, it's important to generate a hash on both the original and the copy, and compare them to ensure that the copy is true. We can do this with sha1sum (or md5sum if you prefer)

As you can see, the generated hashes are the same, proving the integrity of your copy. Also, notice that rather than just running sha1sum in the shell, we are also saving the output. Although I largely neglect it in this post, carefully documenting every step you taking in the analysis process is extremely important.
Mounting an Image with Explicit Read-Only Access
The next step is to actually mount your new copy of the image. It is absolutely vital that you do this properly in order to avoid accidentally writing metadata information to the image and thus compromising its integrity. One way to do this is to use the mount command.
Now, the mount command is nothing too special - virtually every Linux distribution includes it - but it does have some lesser-known options that can help ensure the integrity of your working copy of the data. For example:

This looks pretty complicated, so I'll explain...
- -t vfat specifies the type of file-system you are mounting
- -o indicates that we're about to specify some options
- ro specifies mounting as read only
- By specifying noexec we ensure that no binaries will be allowed to run directly on the mounted filesystem
- loop indicates a loop interface which allows us to access the files via the specified directory
- noatime is essential as it specifies not to record the access time in the file system's metadata
- fd0 is the image we are mounting, and
- ./working_dir/ is the directory that we are mounting it to
Mapping the File Hierarchy Within an Image
The ls command is another one that is extremely common and well known, but that includes some options that are particularly useful for forensic analysis. In this case, we are going to map the file hierarchy using the -alR options. The command, and the output are shown here:
The ls command is another one that is extremely common and well known, but that includes some options that are particularly useful for forensic analysis. In this case, we are going to map the file hierarchy using the -alR options. The command, and the output are shown here:
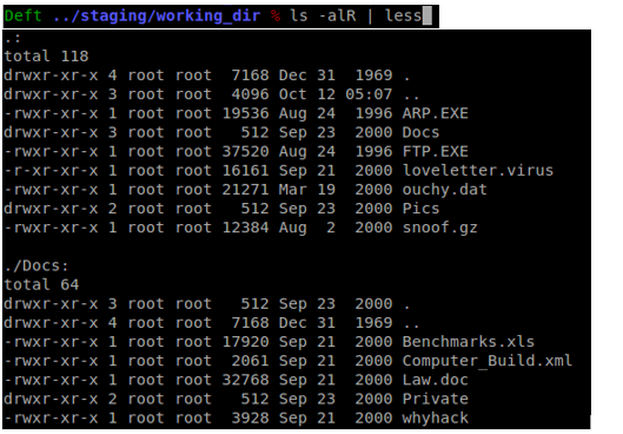
As you can see, the output shows the directories, and the files/directories that exist within. Another way to view this would be to use the tree command.
Again, I'll explain the parameters:
Again, I'll explain the parameters:
- a tells ls that we want to analyse all of the files
- l tells it to use the long-list format, and
- R tells it to list directories recursively
Enumerating Files Within an Image
In the example above, we did, technically, get a list of files, but they are listed within the context of the heirarchy. Using the find command, however, we can get a simple list of files in an easy-to-read format:
In the example above, we did, technically, get a list of files, but they are listed within the context of the heirarchy. Using the find command, however, we can get a simple list of files in an easy-to-read format:
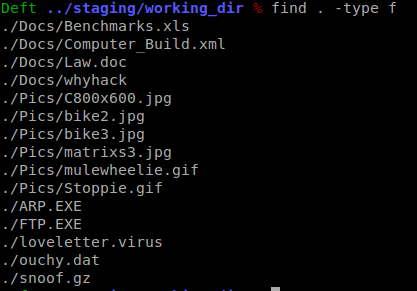
As you can see, the files are enumerated in a format that is easy to view at a glance. In the find command, the . indicates that we are going to start looking in the current directory, and -type f means that we're looking for files only (as opposed to directories, for example).
Enumerating File Types Within an Image
Similar to the method above, we can also use find to get a list of the files that includes detailed information about each file, such as the file format, time stamps, etc.
Similar to the method above, we can also use find to get a list of the files that includes detailed information about each file, such as the file format, time stamps, etc.
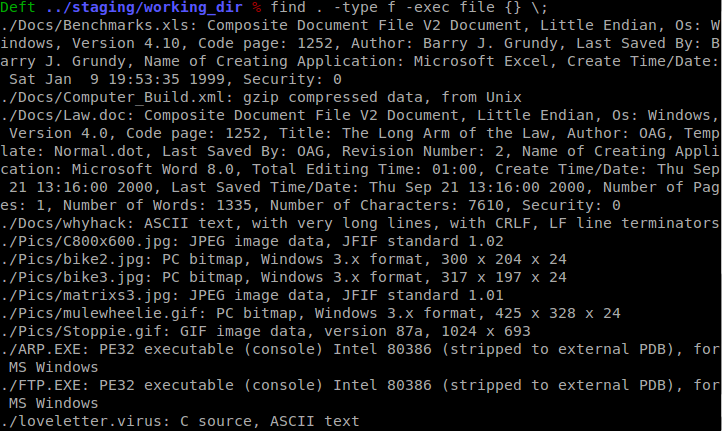
In this case, the -exec indicates that we want to run another command on the output. file {} is the command to be run, which means that we are looking for all files. \; indicates the end of -exec statement.
Searching for Specific File Types Within an Image
As you can see, the output above is pretty messy. However, by piping to grep you can easily search the above output for specific file types as in the following example:
As you can see, the output above is pretty messy. However, by piping to grep you can easily search the above output for specific file types as in the following example:

Notice that grep is able to locate all image files, regardless of the format (JPEG vs GIF) and despite a deceptive file extension (as in ouchy.dat).
Searching for Specific Strings Within an Image
To demonstrate how to search for specific strings within a disk image, I'm going to use two methods: (1) Using a single, specific string, and (2) using a pre-made text file. Both methods will utilize grep with some neat options.
1. Using a Single, Specific String
Searching for a string within an image is pretty straightforward. Consider the following example:

The parameters used with grep are as follows:
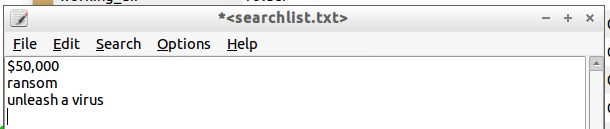
2. Using a Pre-Made Text File
This example comes directly from Barry Grundy over at www.linuxleo.com. We are going to use grep to look at a text file, and then search and image for any lines included in that text file. For example, I've created a file called searchlist.txt, which looks like this
- a allows us to process the image file as though it were text
- b tells grep to print the byte offset, which you can see is 75441 in this example (I'll show why this is important later)
- i simply tells grep to ignore the case, so that 'ransom' could also be used to find 'RANSOM', 'Ransom', etc.
2. Using a Pre-Made Text File
This example comes directly from Barry Grundy over at www.linuxleo.com. We are going to use grep to look at a text file, and then search and image for any lines included in that text file. For example, I've created a file called searchlist.txt, which looks like this
In order to use this file to search the image, we use grep as so
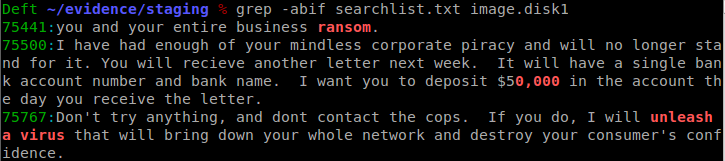
As you can see, we've added a single additional parameter to grep - the f parameter. This simply instructs grep to obtain the search pattern from the file, which we then specify as "searchlist.txt".
Using the Byte Offset to View Binary Data in an Image
Finally we're going to put that byte offset information to use. Deft has another nifty built-in tool called xxd that allows you to view binary files. Using the offset we acquired in the last example, we can tell xxd exactly which part of the image we want to view:
Finally we're going to put that byte offset information to use. Deft has another nifty built-in tool called xxd that allows you to view binary files. Using the offset we acquired in the last example, we can tell xxd exactly which part of the image we want to view:
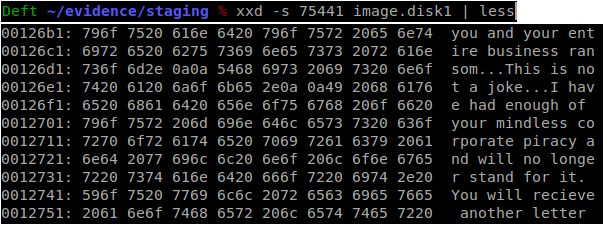
The -s option of xxd allows us to specify the offset (75441 in this example) to start viewing the image at. If we leave that parameter off, xxd would simply start at the beginning of the image. We also pipe to less for readability.
Conclusion
Although this has been "quick and dirty", I hope I was able to show you a little bit about the potential that these common tools have in assisting you in learning about Digital Forensics.
Again, I highly recommend the www.linuxleo.com website. In fact, this post can almost be considered a primer to the "Beginner's Guide v3.78" PDF.
If you have any questions or comments, please don't hesitate to let me know via the comments section below!
 RSS Feed
