 A simple menu create using states |  A 'win' screen created using states |
Developing a game using states, allows you to organize your code, while also adding a more complete and dynamic gaming experience for the player. To see this example in action, click here.
In this tutorial I’m going to walk you through creating a very simple JavaScript game using game states and the Phaser framework.
Since this tutorial is only concerned with learning how to use states, and is not a general Phaser tutorial, you will get the most out of it if you’ve already worked through the main Phaser tutorial located here.
Since this tutorial is only concerned with learning how to use states, and is not a general Phaser tutorial, you will get the most out of it if you’ve already worked through the main Phaser tutorial located here.
Understanding States
Using states allows you to break your game up into smaller pieces that can handle different mechanics of the game, such as a menu. In this tutorial we’re going to create five states that will function as follows:
1. The Boot State - We are simply going to start the physics system, and then call the Load State
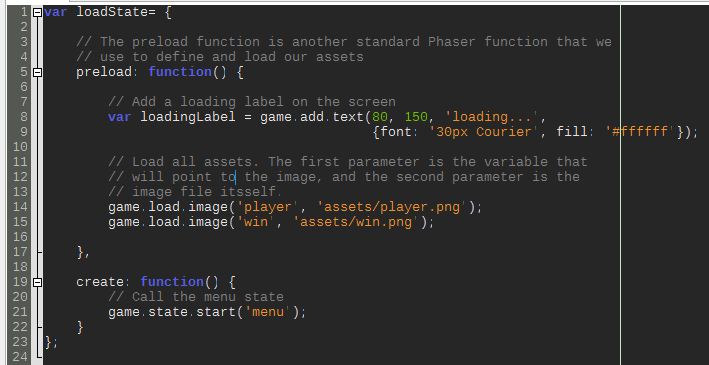
2. The Load State - We display a ‘loading’ text, load our assets, and call the Menu State
3. The Menu State - We display the game name, get player input and call the Play State
4. The Play State - This is where the game logic is actually handled. When the player wins (there is no way to lose), we call the Win State
5. The Win State - This state will display a simple ‘You Won’ message, get player input, and re-call the Menu State
Using states allows you to break your game up into smaller pieces that can handle different mechanics of the game, such as a menu. In this tutorial we’re going to create five states that will function as follows:
1. The Boot State - We are simply going to start the physics system, and then call the Load State
2. The Load State - We display a ‘loading’ text, load our assets, and call the Menu State
3. The Menu State - We display the game name, get player input and call the Play State
4. The Play State - This is where the game logic is actually handled. When the player wins (there is no way to lose), we call the Win State
5. The Win State - This state will display a simple ‘You Won’ message, get player input, and re-call the Menu State
Using a Web Server
In order to access a game created using states, you need to run a development web server from the game’s root directory (where the index.html file is located - we’ll get to this in a minute). There are a number of development web server options, but my favorite is Python.
Using Python’s built-in web server is a very simple, one-line command. If you have Python installed on your computer, then you can simply do the following:
1. Open a command prompt (Windows), or shell (Linux/Mac)
2 . Navigate (via ‘cd’) to your games root directory

3. If you have Python 2.7 installed, type ‘python -m SimpleHTTPServer’, if you have Python 3.x installed, type ‘python -m http.server’. I have Python 3.4 installed, so I use the latter:
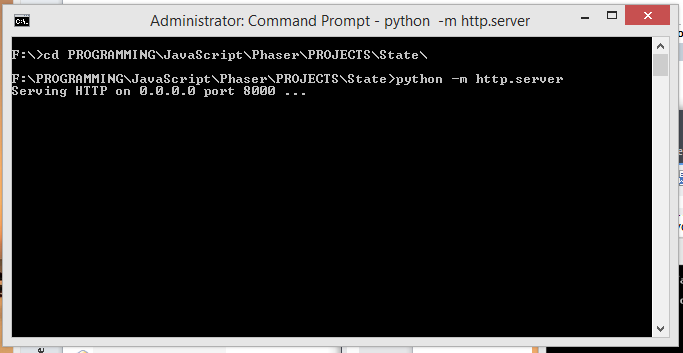
You’re not going to need the server right now, so you can kill it by pressing CTRL+C. However, you will be using it before this tutorial is finished, so you might want to keep the Command Prompt window open.
Creating the Folder and File Structure
The first thing that we’re going to do is create a folder hierarchy and files. As seen in the screen-shots above, I’m calling this project State and I’m naming the root directory accordingly. Also, you’ll see that the names of the .JS files will correspond to the names of our states. My folder hierarchy looks like this:
\States\
|
|- phaser.js
|
|- index.html
|
|- assets\
| |
| |-player.png
| |
| |-win.png
|
|- js\
|
|- game.js
|
|- boot.js
|
|- load.js
|
|- menu.js
|
|- play.js
|
|- win.js
Although those files will be empty right now, it’s usually a good idea to go ahead and create them in that hierarchy, and we can fill it in as we go.
The Assets
For this game we’re only going to use two very simple images. A 16px by 16px (16x16) player.png image:
For this game we’re only going to use two very simple images. A 16px by 16px (16x16) player.png image:

And a 16x16 win.png image:

Save these into your ...State\assets\ folder.
Index.html
The index.html file acts as a type of translator, allowing us to display the JavaScript content to the web browser. Our index.html file serves the following purpose:
1.Loads all of the JavaScript files
2.Provides the div element to map to the actual game.
If this sounds confusing, don’t worry about it. Hopefully it will begin making sense as we go.
In your index.html file, input the following code (note that the comments are for your benefit, and you do not necessarily have to include them in your own files):
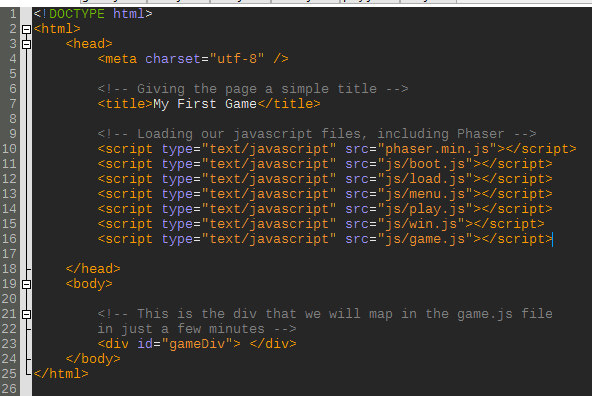
Notice that the game.js file is loaded last. That is important. If you put any of the other files after it, you will get a “can’t find...” error.
That’s all there is to it!
That’s all there is to it!
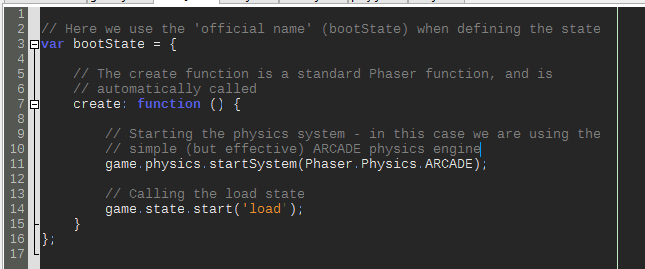
game.js
Just like the index.html file, the game.js file is rather simple. It performs three basic functions for us:
1.Creates the Phaser.Game object, and maps it to the gameDiv element of the html file
2.Adds the various states
3.Starts the boot state
Open your game.js file, and input the following code:
Just like the index.html file, the game.js file is rather simple. It performs three basic functions for us:
1.Creates the Phaser.Game object, and maps it to the gameDiv element of the html file
2.Adds the various states
3.Starts the boot state
Open your game.js file, and input the following code:

boot.js
As mentioned above, the boot state is very simple. We simply want to start the physics system and then call the ‘load’ state:
As mentioned above, the boot state is very simple. We simply want to start the physics system and then call the ‘load’ state:
load.js
In the load state, we simply load our assets, and then call the menu state:
In the load state, we simply load our assets, and then call the menu state:
menu.js
The menu state is a little more complicated but not by much. In the previous two states, we performed our actions automatically and then called the next states without the human player having to do anything
In the menu state, however, we want to display instructions to the human player, and then wait until they perform an action before calling the next state. Because of this, we take the game.state.start statement out of the create function and put it into it’s own ‘start’ function. The start function is only called when the player takes the required action (presses the ‘W’ key).
Open your menu.js file, and input the following code:
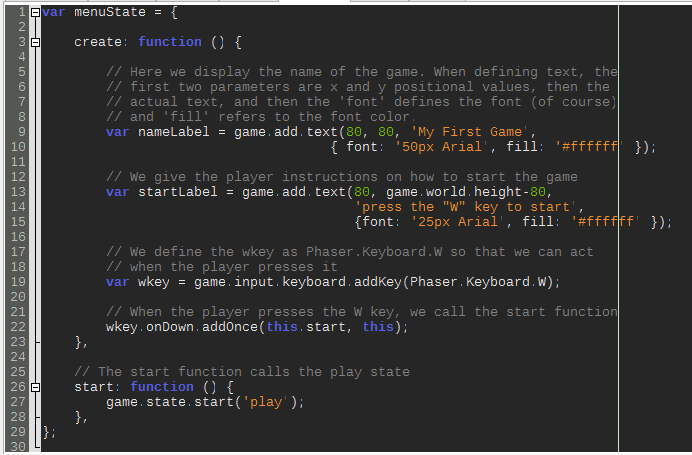
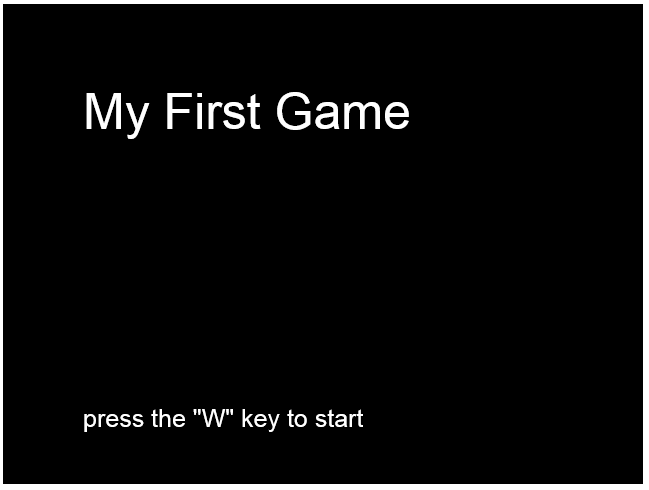
A look at the menu screen:

Although this may look very basic, and maybe even a little bit pointless, don’t underestimate the power of a menu screen. Remember, you have as much power here as you have in programming the actual game logic. You can create ways for players to adjust or mute sound volume, play in full-screen/windowed mode, select difficulty etc.
In an rpg-type game you might even have two menus: a main menu, and a ‘Character Creation’-type menu that the player can use to customize their character before ever starting the game.
In an rpg-type game you might even have two menus: a main menu, and a ‘Character Creation’-type menu that the player can use to customize their character before ever starting the game.
play.js
Since this tutorial is dedicated to showing you how to utilize states, and not to teach any game mechanics, our play state is going to be pretty simple. We will have three functions that will be as follows:
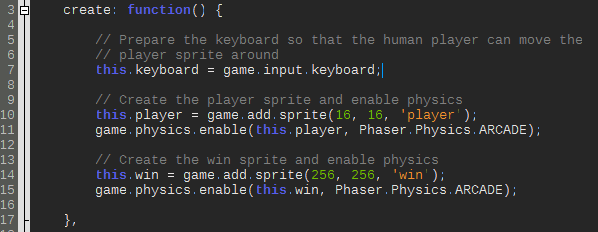
Create
The purpose of the create function is simply to prepare the keyboard for input and to create our ‘player’ and ‘win’ sprites:
Since this tutorial is dedicated to showing you how to utilize states, and not to teach any game mechanics, our play state is going to be pretty simple. We will have three functions that will be as follows:
Create
The purpose of the create function is simply to prepare the keyboard for input and to create our ‘player’ and ‘win’ sprites:
Update
The purpose of the update function is to define what happens when the ‘player’ sprite overlaps with the ‘win’ sprite (call the Win function), and allow the human player to move the ‘player’ sprite with W,A,S,D keyboard input:
The purpose of the update function is to define what happens when the ‘player’ sprite overlaps with the ‘win’ sprite (call the Win function), and allow the human player to move the ‘player’ sprite with W,A,S,D keyboard input:

Win
Lastly, the Win function calls the win state:
Lastly, the Win function calls the win state:

Here’s a peek at the game in action:

It’s very exciting :)
win.js
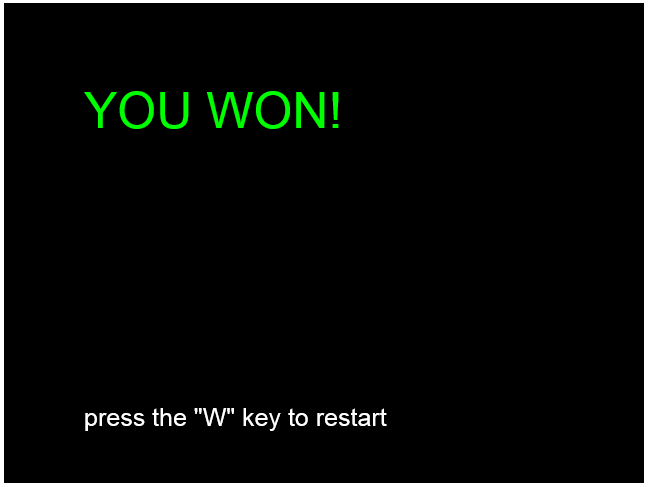
The Win State is almost identical to the Menu state with the following functional differences:
1.Instead of displaying the name of the game in white text, we display “YOU WON!” in green text
2.All texts that reference ‘Starting’ the game, are changed to reference ‘Restarting’ the game
3.Instead of calling the Play State, we call the Menu State
Open the win.js file, and input the following:
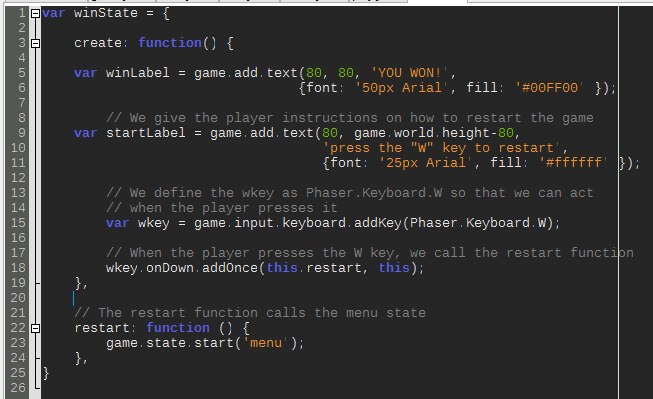
A look at the win screen - you can see the similarity with the menu screen:
Conclusion
This has been an intentionally simple demonstration, but being able to use states when creating your games gives you a lot of power in both presentation and functionality. You can display different types of menus, various win/lose screens, etc.
To see this example in action, click here.
Using your imagination and creativity, you can utilize these tips and tools to create something great. And when you do, I hope you’ll share it with me via the comments below!

 RSS Feed

